12.14.2011

Chunky Chicken Chili

I adore soup.  And when Ryan and I saw this one on Food Network, we looked at each and said, "We need to make this now!"  And we did.  
It has just the right amount of heat.  It also comes together fairly quickly, which is always a plus in my house.  


Not a great picture...I apologize...and I'm working on my pictures...just be patient with me.  
And don't let it deter you from making this.  It is really, quite delicious.


Chunky Chicken Chili
    adapted from Food Network

4 Tbsp butter
2 lbs boneless, skinless chicken breasts, cubed
1/4 cup flour
1 large onion, chopped
1/4 cup red pepper, chopped
1/4 cup green pepper, chopped
2 cups chicken stock
1 cup heavy cream
2 Tbsp chili powder
1 tsp ground coriander
1 tsp ground cumin
1 tsp cayenne pepper
1 Tbsp black pepper
1 Tbsp kosher salt
2 (14.5 oz) cans butter beans, drained and rinsed
1 (4 oz) can mild green chiles
1/2 cup sour cream
cheddar cheese, for garnish
parsley, for garnish

In a large Dutch oven, melt the butter over medium-high heat.  Brown the chicken pieces until nicely colored and cooked through.  Remove chicken to a large bowl and set aside.

Add flour to the pan and stir, to create a roux.  Add the onions and peppers.  Add chicken stock to deglaze the pan and stir in the heavy cream.  Lower heat and cook until mixture thickens, about 5 minutes.  When sauce has thickened, add chili powder, coriander, cumin, cayenne, black pepper and salt.  Stir and cook for a few minutes.  Add the beans, chiles and chicken and simmer for an additional 10 minutes.  Stir in the sour cream before serving.  Garnish with cheese and parsley.  

Enjoy!!

12.09.2011

Kitchen Happenings

A lot of cooking and baking has been going on in my kitchen lately.  Trouble is...I forget to take pictures...or the kids are "starving", so I just feed them and don't bother with the pictures.  
But...I still want to share some of my favorites with you.  They'll just have to be links to other people's sites rather than posting them on my own.  So in no particular order...

from Simply Organized Living
These are delicious!!  And so easy.  We used brown and serve rolls with ham and american and some with turkey and american.  I also left out the poppy seeds (that would have been a melting point for the kids).  These would be great for a crowd and the filling possibilities are endless.

from The Kitchen Sink
All I can say is "Oh Yum!"  I love all Mexican food...in a "could eat it every day" kind of love.  But this was a first time for me.  And it was so worth the effort of making it.  Like she says, you could substitute the ground beef and pork sausage with ground chicken and turkey sausage or whatever kind of ground meat you like to use.  Its all the other flavors that really make this what it is.  I made 1-inch meatballs, but will make them about half the size next time (I don't like to have to cut things up in my soup.)

from Jamie Cooks It Up!
The kind of dish my kids won't fuss about when they hear I'm making it.  I did not have cream of chicken soup at home when I made this, so I improvised on the sauce and did more of a "swedish meatball sauce" to go with it.  You could certainly skip the sauce altogether though.  

from My Baking Heart
This was the perfect combination to satisfy my Mexican desires and the kids picky mouths.  They'll eat any and all of the "bubble" recipes.  {They just really like biscuits I think...and who can blame them!!}
Perfect after work meal, because its quick and easy!  

from Once a Month Mom
You know when your potatoes are starting to sprout?  And you really don't want to put them outside for the deer?  And the only potatoes your kids will eat are mashed potatoes or hashbrowns from McDonalds?  Enter freezer mashed potatoes!  I made this about a week ago and pulled out the first one on Wednesday to have for supper.  I wasn't sure how the texture would be coming from the freezer, but they were delicious.  

I think that's it for sharing today.  Hopefully you found some inspiration for your own kitchen.  
Have a great weekend!  

12.04.2011

Red Velvet Crinkle Cookies

We've had a fun filled weekend of activities at our house.  With Ryan gone hunting for the weekend, the kids and I played.  We went to the movie, played with cousins (and Grandma), made a gingerbread house...


Yes...its a store bought kit.  We were focusing on quality time here, not the quality of the gingerbread.  I did my good mother deed by not allowing the kids to eat any of the candy or cookies (who knows how long those had been in there!!)

We watched more movies, went to church and out for lunch, made cookies...


I lied...I made the cookies myself.  No kiddos in the room.  I needed to be alone in my kitchen...just me and my oven and my mixing bowls.  Ever had one of those days??  And then I ate a bunch of the cookies and made by kids have bananas for their snack.  That may veto my good mom deed from earlier.  But like my dad used to say, "Do as I say, not as I do."

And now the kids are wrestling.  Hmm...pretty sure this will end up with someone in tears yelling, "It's all your fault!"

These cookies are soft and chewy.  Chocolaty and sweet.  Very much semi-homamde.  A great cookie to have in your repertoire. 


Red Velvet Crinkle Cookies
   adapted from Cookin' Cowgirl

1 box devils food cake mix
2 eggs
6 Tbsp butter, melted
1/2 bottle red food coloring
1 cup powdered sugar

Preheat oven to 375.  Melt the butter and set aside to cool.

In large mixing bowl, combine cake mix, eggs, butter, and food coloring.  Mix well.  

Drop by teaspoon (I used the smallest Pampered Chef cookie scoop) into the powdered sugar.  Roll around to coat (and make into a ball).  Shake off excess powdered sugar and place on cookie sheet.  

Bake for 9 minutes.  Allow to cool on cookie sheet for 1 minute and then move to cooling rack to cool completely.  Enjoy!

makes about 3 dozen cookies

I'm hoping to get a lot more Christmas baking done, so hopefully I'll have a lot more to share with you soon.
I'm linking up to Jane Deere's Fusion Fridays  

11.27.2011

Sans Rival - Daring Bakers' November Challenge

I'm not usually a procrastinator, but I certainly was for this month's Daring Bakers' Challenge.  
I started this morning, and finished just in time to get the kids to the movie I promised.  

Catherine of Munchie Musings was our November Daring Bakers’ host and she challenged us to make a traditional Filipino dessert – the delicious Sans Rival cake! And for those of us who wanted to try an additional Filipino dessert, Catherine also gave us a bonus recipe for Bibingka which comes from her friend Jun of Jun-blog.

As you can probably tell from the pictures, I chose not to do the Bibingka.  I'm not sure the kids would have appreciated me cancelling our movie date for some additional baking.


This cake definitely challenged my baking skills as I had never made meringue before.  Really??  I know...I'm certain I didn't in culinary school.  Although it seems like something we should have learned.  Maybe I skipped that day.  (Just kidding, Mom!  I never skipped.)

My meringues did not turn out as crispy as they should have been.  And I think that certainly altered the overall results of the cake.  Mine was kind of chewy.  Not in bad way, but I think it would have been better if the layers were crisp.  It was a very rich dessert.  And probably not something I would take the time to make again, but it was fun to try!  

I should note that I also departed from the french buttercream the recipe called for.  My candy thermometer is broken, and I wasn't going to risk it without one.  So I used my own chocolate buttercream recipe.  

Thanks for another great challenge Daring Kitchen...looking forward to December!

11.16.2011

Coffee

If you know me...even a little..you should know that I love love LOVE coffee.  It doesn't matter what time.  Or what day.  Or what flavor, for that matter.  I don't need cream or sugar (although sometimes its fun). 

So today...because yesterday was such a wonderfully, horrible day...

Pinned Image
from donnasdigitalcreations.blogspot.com


That's right...
Bring. It. On.

11.06.2011

Bring on the Cake

I've been keeping busy with cakes over the last couple of months and thought I'd share some of the pictures.  I'm not a professional by any means, but have a blast doing it none-the-less.

First up was a groom's cake.  My only instruction was for it to be fireman themed with paramedic in there somewhere as well.


It was cute and fun and rumor has it they loved it!

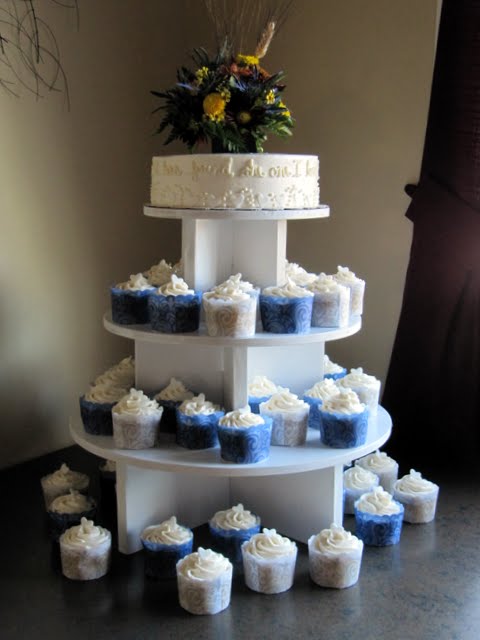
Last weekend I did a small wedding cake with cupcakes for some friends.  My only instructions for this one was that it needed to be lactose free.  It was my first time making lactose free frosting, but it turned out quite well and the taste was very nice.


I decided to use the large decorative cupcake wrappers, but probably wouldn't waste my time with them in the future.  As they cooled, the cake separated from them and looked terrible.  Thank goodness for frosting!!!  They were using the verse, "My soul has found the one I love," (from Solomon 3:4), so that was written around the cake.  And my dad made the cake stand for me (thanks, Dad!!) and let me keep it for future use.  Win-win for me on that one!

Yesterday was my dear niece's 6th birthday and it was Tangled all the way!

(My apologies for the washer hook up in the background...I was NOT moving the cake again)

The tower was a bit of a headache, but we got it worked out.  And Grace was very pleased, so this was a success as well!

So, there's my cake month in review.  Hope you enjoy looking!

11.01.2011

White Chicken Enchilada Skillet

Everyone seems to be making their "bucket list."  I have mine too.  But what about the list for when my kids are out of the house and I'm not catering to their every need?  Has anyone named that list yet?  I'm going to work on it...

And now, in no particular order...
1.  Keep my house clean for more than 15 minutes.
2.  Sit on my couch with a book and a steaming cup of hot coffee.
3.  Be able to get dressed and leave the house without having to use a Shout pen on my clothes to get the sticky stuff off.
4.  Take an uninterrupted shower.
5.  Add some spice and excitement back into my cooking.  

The list goes on...but I won't bore you.  

This dish is simple and delicious and kid friendly (it has ranch dressing in it after all).  And it really is good just as it is.  But there is so much room to play and add and experiment!


Green chiles, peppers and onions, smoked paprika...yum.  (Maybe not all together...you get where I'm going though)  But for now...15-ish years to be exact (but whose counting?),  I'll take the interruptions, continue cleaning, enjoy my kids and make simple delicious suppers.  

White Chicken Enchilada Skillet
original recipe from Kraft Foods

1 Tbsp. oil
1 lb. boneless skinless chicken breast,
   cut into bite size pieces
1 can (14 1/2 oz) chicken broth
1/4 cup Ranch dressing
2 Tbsp. flour
6 flour tortillas, 
   cut into bite size pieces
1 cup Mexican cheese blend
1/2 cup salsa

Heat oil in large skillet on medium-high heat.  Add chicken and cook 7 minutes or until cooked through, stirring occasionally.

Mix broth, dressing and flour until well blended; gradually add to skillet, stirring constantly.  Add tortillas, stir to combine.  Bring to boil; reduce heat to medium-low and simmer 3 minutes.

Sprinkle with cheese; cover.  Simmer 3 to 5 minutes or until cheese is melted.  Top with salsa.  (and anything else your heart desires)

Makes 4 large servings

**I'm linking up with Jane Deere's Fusion Fridays**

10.29.2011

Candy Corn Cookies

The kids and I spent some time in the kitchen this past weekend.  Wanna see what we did??  


Candy Corn Sugar Cookies.  You can get the detailed instructions over at Our Best Bites and my sugar cookie recipe here.

Side note:  Our Best Bites is one of my favorite websites EVER!  These ladies have wonderfully simple recipes that are also delicious.  They haven't failed to impress me yet.  

Back to the cookies...
The kids had a wonderful time coloring the sugar cookie dough.  Henry said it tasted lots better than play-dough.  (I thought we had gotten past eating the play-dough, but I may have been wrong.)  And I'd rather have a tray full of these than real candy corn any day.  Put in a cute little jar with some fall ribbon and you'd even have a great gift!

Happy Fall!  

10.27.2011

Povitica - Daring Bakers' October Challenge

The October Challenge over at the Daring Kitchen was Povitica 
(hosted by Jenni of The Gingered Whisk).  A traditional European dessert bread 
that is by far one of the most delicious breads I've eaten. 


Its been quite awhile since I've challenged myself in the kitchen.  Kids and work and "life" just get in the way.  So when I heard about The Daring Kitchen and the monthly challenges, I quickly signed myself up!  What a great reason to bake something I might not otherwise get to.  

It was some of the most fun I've had in my kitchen in a long time.  As with any yeast bread, it was a process, but very much worth it.  It was a full days process for me, but that is mostly because I have a cold kitchen and things take forever and a day to rise.   

I ended up using all the filling on the first loaf (I think I may have added a few too many nuts resulting in a very thick filling).  So for the second loaf, I kept it simple with sugar and cinnamon and butter.  And then forgot to take a picture.  But it was beautiful!  And delicious!  

Can you tell I enjoyed eating it?  Its been my breakfast, snack and dessert all week.  


I cannot wait for next month to see what the challenge is!  (As if I really need a reason to be in the kitchen.)
Posted by Picasa

9.16.2011

Italian Mac-n-Cheese

This mac and cheese is such a hit in our house.  It was on a weekly rotation for quite a while.  
Then the kids decided they didn't like tomatoes.
They still think they don't...but I'm bringing it back on board.  They'll get over it.

Picture of Italian Mac-n-Cheese Recipe
Recipe courtesy foodnetwork.com
If you have everything set out and ready to go, you can certainly get this on the table in thirty minutes.
And!  It freezes beautifully! 
You can feed a very large family with this recipe...we usually prepare the entire thing and then freeze half of it.  

Italian Mac-N-Cheese
original recipe by Rachael Ray
Serves 6-8 people

1 lb penne rigata (or other tube pasta)
1 lb sweet sausage
2 tbsp extra virgin olive oil
1 tbsp butter
3 cloves garlic, chopped
6 baby portabella mushrooms, chopped
salt and pepper
2 tbsp flour
1 cup chicken stock
1 cup heavy cream
2 1/2 cups shredded cheese (we use an italian 4 cheese blend)
1 can diced tomatoes, drained well
1 tsp hot sauce, optional
1/2 cup Parmesan

Bring a large pot of water to a boil.  Salt the water and cook pasta to al dente, about 8 minutes.

In a nonstick skillet, brown and crumble the sausage.  Drain cooked crumbles on paper towel lined plate.  Return pan to heat and add extra virgin olive oil, butter, garlic and mushrooms.  Season liberally with salt and pepper.  Saute 3 to 5 minutes, until mushrooms are lightly golden brown.

To mushrooms, add flour and stir, cooking 2 minutes.  Whisk in stock, then add cream and stir.  Bring cream to a bubble, then stir in 2 cups of cheese.  When cheese has melted, add tomatoes.  Bring sauce back to a bubble, remove from heat and adjust seasonings, adding hot sauce if desired.

Combine cheese sauce with sausage and pasta and transfer to baking dish.  Sprinkle remaining half cup shredded cheese and Parmesan over the top and brown under broiler.


9.11.2011

What's for Dinner? Week 5

Back to planning.

Last week was a little hectic.  I haven't worked 4 days a week since before Henry was born...and he's 3!!  Needless to say, we are going through a bit of an adjustment period in our house.  

Ryan leaves for his hunting trip this week...so once again its not a typical week in our house.  And next week while he's gone the kids and I will be eating whatever is in the house.  No meal plans next week.  

Sunday lunch:  Pepperoni Pizza Monkey Bread
Sunday supper:  Chicken Taquitos
Monday:  Homemade Pizza Rolls
Tuesday:  Tortilla Lasagna
Wednesday:  Italian Mac n Cheese
Thursday:  Leftovers
Friday & Saturday:  I'm home alone for the weekend...so I'm still planning the perfect "cooking for one" meal. 

Have a great week! 

9.02.2011

Homemade Box Brownies

I have a confession to make.  

I will take a box brownie over homemade any day.  No questions...hands down...done and done.  

I have just never had a "from scratch" brownie that tasted as good.  

Until I tried this recipe.  I wasn't going to give up on the idea of a from scratch brownie...
and I'm so glad I didn't.  

These are chewy, fudge-y, crisp on the edges (if I didn't have a bridesmaids dress to fit into in two days, I'd be in the kitchen making another batch).  


Mmmm...so good!  Ryan couldn't believe they were from scratch.  
And realistically....while I don't always have a box of brownie mix in my pantry...
I always have these ingredients.

Homemade Box Brownies
adapted from King Arthur Flour's King Arthur Fudge Brownies

1 cup unsalted butter
2 1/4 cups sugar
1 1/4 cups cocoa powder
1 tsp baking powder
1 tsp salt
1 tsp instant coffee
1 Tbsp vanilla extract
4 large eggs
1 1/2 cups flour
2 cups chocolate chips

Preheat oven to 350 F.  Grease a 9" x13" pan and set aside.  

In a saucepan, over low heat, melt the butter, then add the sugar and stir to combine.  Heat on low until the mixture is hot, but not bubbling (it will look shiny as you stir).

Transfer the sugar mixture to a medium sized bowl.  Stir in the cocoa, baking powder, salt, instant coffee and vanilla.  Whisk in the eggs, stirring until smooth.  Add the flour and chocolate chips.  Stir until smooth.

Spoon batter into prepared pan.  (At this point I added chopped peanut butter cups to the top...be creative and add your favorite candy or leave as is)  Bake for 30 minutes, or until cake tester comes out with a few moist crumbs on it.  The edges should feel set and the center should look very moist, but not raw.  Remove from oven and let cool completely.  

Cut and serve!


I'm linking up to Jane Deere's Fusion Fridays  

8.29.2011

Proverbs 31

Sometimes, its overwhelming to fill the roles of mother, wife, daughter, friend (you get the idea).  Sometimes we focus on the wrong things...sometimes the "little things" get to us.  Its not easy.  

Take a look at this post over at Casey Wiegands blog based on Proverbs 31.  

Its refreshing...its honest...its inspiring.  It reminds me why I need Jesus!  

I pray its refreshing and uplifting and just what you need today.  

8.27.2011

Spaghetti Sauce for Canning

Well it's begun...


The craziness of tomato season.  I think our plants are on steroids.  Huge stems...lots of dead leaves...and plenty of tomatoes to get us through the next year (or two).


After doing salsa for quite a few years (and having enough to last through the year),
we decided to try some spaghetti sauce last year...
Completely worth the effort.

Slightly sweet...nice and thick...
Perfect for spaghetti or pizza or dipping.


Spaghetti Sauce
adapted from recipe #37563 on food.com
Makes 3 quarts

1/4 cup olive oil
3 onions, chopped
3 cloves garlic, chopped
3-12 oz cans tomato paste
3-4 tbsp brown sugar (this will depend on the acidity of your tomatoes)
1 tbsp dried oregano
4 tsp salt
1 tbsp dried basil
1 tsp black pepper
12 cups tomatoes, peeled, cored and chopped 

Heat oil in large pot over medium high heat.  Saute onions and garlic until tender.  
Add remaining ingredients and bring to a boil. 
Reduce heat; simmer, partially covered, for 2 hours stirring occasionally.
Blend to smooth (if desired).
You can now proceed with canning, (process for 35 minutes in a boiling covered canner)
or cool completely and freeze.  


I'm linking up at Jane Deere's Fusion Fridays


Posted by Picasa

8.22.2011

What's for Dinner? Week 4

We made it through the first AND second days of Kindergarten.  And I think I'm the only one scarred from it.  :)  Okay, it wasn't quite that bad...but I'll never forget it!  She's having a wonderful time though...and that's what is important.  

On to this weeks' menu:

Tuesday:  We have a meeting at school, so the kids are having corn dogs with the sitter
Wednesday:  Brats
Thursday:  Leftovers
Friday:  Fish and Homemade Potato Chips (this will be a first for me!)
Saturday and Sunday:  ??  We'll see what happens by then


8.17.2011

Grandma Doris

I miss my Grandma.  


I want to call her...

To tell her that I'm so overwhelmed at the thought of Annika starting Kindergarten tomorrow...
To have her tell me that it will be great...that Annika will do great...but that she can't believe she's going to Kindergarten either.
To hear what she has been keeping busy with...
And how her church friends are.
To have her remind me how wonderful my husband is...and how blessed I am to have him in my life...
To hear stories about what she used to do for Grandpa...
To remind me only to use the seasonings in my food that Ryan likes.
So I can tell her what I've been sewing...
And how my garden is doing.
To hear her say that she loves me...that she can't wait to see me...but that I shouldn't come up unless the weather is really good.  

I miss her so much...my heart breaks.  

She used to have this wonderful desert at her house.  Chocolate cake.  Marshmallows.  Chocolate Frosting.  I'm not sure what the real recipe is...or what she called it.  But I was craving the comfort of Grandma Doris so badly yesterday I had to recreate something similar.  


Too bad my recipe only made 6.  I may need more before the week is over.  :)

So here's to you Grandma Doris....
Thank you for being an amazing Woman of God, Grandma and friend.  

I love you!

Keep watching for this wonderful recipe...it's coming!  

8.15.2011

What's for Dinner? Week 3

With Annika's birthday, there was no menu last week.  It was a "use up what's here" week.  Cleaning out the fridge and pantry to make room for the groceries I would need for her party.

This week, with school starting up, we're back in the game.

Monday:  Stuffed Chicken Breasts
Tuesday:  Taco Pasta Shells
Wednesday:  Meatball Subs
Thursday:  Steak and Baked Potatoes (its the first day of school and this is Annika's favorite!)
Friday:  Fish and Baked Rice Pilaf
Saturday:  ?
Sunday:  ?

Okay, so I'm almost back up and running.  I'll fill in those two when I figure them out.  :)

What are you serving this week?

8.14.2011

Happy Birthday, Annika!

My little girl turned 6 this weekend...what!?!?!?!?!?!  

Can't believe it myself.  Where did the time go??  As far as I'm concerned we should still be here.

August 13, 2005 - 3 lbs 14 oz -
and already planning to do things her own way  :)


Okay, not "at the hospital" here, but...you get my drift.


What a beautiful, young lady she is becoming.  I pray she continues to grow in the Lord...to love Him more each day...to serve Him and serve others...to stand up for what she believes in...and so much more...

Love you little lady!! 

8.01.2011

What's for Dinner? Week 2

After an amazing weekend with girlfriends, Monday was a struggle to get back into.  But I managed to pull together an almost complete menu for the coming week.

Monday:  Brats and Lemon Basil Pasta
Tuesday:  Crock Pot Roast and Mashed Potatoes
Wednesday:  Leftovers
Thursday:  Chicken Sandwiches
Friday:  ??  (this is the "almost complete" portion)
Saturday:  take out (we have a day packed full of "to-dos"
Sunday:  Breakfast for Supper - I'm thinking breakfast burritos

7.25.2011

What's for Dinner?

I used to have a major organizing problem...as in...I spent way too much time organizing.  Some may argue there's no such thing as too much organization...oh, you have no idea!

Then a couple things happened.  The first is known as "Annika"...the second "Henry".
Now, I'm kind of on the opposite end of the spectrum (not necessarily because I want to be).  I just can't keep up...it never ends.  It will end...but not for another...(quick math)...15 years.  

In an attempt to keep somewhat sane...and save on groceries...and not eat out all the time...I plan my suppers.  I haven't done great with it this summer, but I'm getting back on track.  I need to...my bank account needs it...my brain needs it...I think my Husband needs it too.  

This week's a little unusual in that I get to go spend a weekend away with my girlfriends (I can't wait!!!).  But it makes for a short week in planning.  

Here it is:

Sunday - Orange Chicken (not a huge success...it was a little overpowering in the vinegar department) 
Monday - Grilled Chicken (based on this tuorial)
Tuesday - Pork Quesadillas with Sweet Corn Salad
Wednesday - Slow Cooker meatballs with pasta
Friday - Off to my weekend away!  Ryan doesn't have an organizational issue...so he won't be doing any planning.  :)


6.10.2011

Is the Tooth Fairy for real?

When Annika came running to tell me that she had her first loose tooth, I was a little worried because I hadn't gotten her tooth fair pillow done yet.  How fast was this going to happen?  Did I have a day at least??  

Well...I've had a few weeks.  Her teeth have as much disgust with change as she does.  The one that was loose is right back in its right full spot.  Holding on for dear life.  And it is killing Annika! Cousins and friends and random people she encounters all have missing teeth.  And its all she can pray for these days.  

And when the time finally comes and that tooth gives up its gorilla grip...we'll be ready with this great little pillow.  Because there is no way the tooth fairy is going to get caught in my house!  


In this pocket you will find
A teensy, tiny tooth of mine.
So while I sleep where dreams are made,
Let's see if you can make a trade.


4.25.2011

My New Favorite Muffin

This isn't a new muffin as much as a new way to make muffins. Are you ready for the simple obvious-ness of it??

Plop them onto a cookie sheet like a cookie...no muffin tin...no muffin liner...
Just a cookie sheet and some non-stick spray.

Maybe you aren't as stunned by this revelation as I was. But I think its brilliant!!
Unlike the one near my waistline, its the kind of muffin top I'm proud of!


So go grab the ingredients for your favorite muffin (even if its a box and some water) and try it out!
They are soft and tender on top -- cripsy on the bottom -- genius!
Posted by Picasa

4.24.2011

Happy Easter!


A glimpse of our Easter weekend.

Hope you all had a great weekend celebrating our Risen Savior!
Posted by Picasa

4.18.2011

Being Aunt Becca

In addition to being "Mom" to my two kids, I have the privilege of being "Aunt Becca" to 11 wonderful little munch-kins (remember the picture in Henry's Birthday post?).  Add to that "cake baker" for their birthdays and I rank right up there with the best of them!  (Ryan will argue that he is the favorite and since he doesn't read this blog, I'll admit that they do love him more).  The effort is all worth it when you see their faces the first time they see their cake.    


This past weekend Olivia celebrated her 3rd birthday.  And her only request was to have Barbie on her cake.  So after browsing online, we decided on a Barbie butterfly cake.  (I apologize for the picture...my camera settings are way off and I can't figure out how to get them back to normal!)


Chocolate cake with an oreo filling and buttercream frosting

I was feeling a little ambitious, so I decided to make her birthday present as well.  (My new sewing machine has given me a little boost of confidence in my sewing abilities.  Not sure if that's good or bad).  I found a great tutorial at Living with Punks for a floor pillow.  After looking at the prices for bean bag chairs, and then the price for making my own (the filling for those chairs are ridiculously priced!), I decided this was the thing to do.  


I think Olivia was very happy with the results and I already have a request for 5 more!  Hmmm...maybe I shouldn't have made it myself...just teasing!

It was actually much simpler than I expected it to be (and I am by definition a novice sewer).  And it was quite fun to see it all come together.  The original size seemed too small when I started getting things together to make this, so I opted for 24 inch circles instead of 17.  It made for a big floor pillow, but it should last a long time that way.    

Now on to my next ambitious project...

4.01.2011

A Little 'April Fools Day' Fun

I definitely do not fall into the "prankster" category of people...my college roommates will attest to this.  But I am all up for some fun with my kids (and in today's case the entire Pre-K class).

I saw this amazingly fun looking cupcakes from Sara over at Our Best Bites (if you haven't been over to their site, you MUST check it out...amazing).  I knew the cupcakes would be perfect for Annika's Pre-K class.  Who doesn't love to tell kids you are bringing cupcakes and then show up with carrots and peas??

So I set to work and here are the results...

Peas & Carrots
Green frosting topped with orange Starburst (quartered) and green Laffy Taffy (rolled into peas)

Mashed Potatoes
White frosting, caramel sauce and a yellow Starburst

Spaghetti & Meatballs
White frosting (made into spaghetti with a piping bag and size 4 tip), Ferrero Rocher covered with jam (I used raspberry, but I think you'd get better color with strawberry)

Cute, right??  And really fun to do.  The kids thought they was quite funny...although a few couldn't get over the idea of what they looked like.  


3.14.2011

Happy 3rd Birthday Buddy!


Henry (who currently asks that we call him Buddy) turned three last week.  And I'll be completely honest...I hated it!  If I could slow down time right now I would!!!  Its an amazing age and I'm enjoying every minute of it.  I think having a 5 1/2 year old (who sometimes thinks shes 12) might help in appreciating the innocence of a toddler.


We had  a wonderful time with friends and family at his birthday party.  Henry had a great time too!

Such a poser!  Buddy was so excited about his robot cookies.  Thanks to Ryan who made the cookie cutter (cause apparently robots aren't "in" this year and the cutters are impossible to find). -- Family pictures are always exciting at our house.  I believe the kids were yelling "I LOVE ROBOTS!"  Makes for great faces. -- I think my cousin and her boyfriend officially decided to wait on a family after this gathering of kids.  They were such good sports in this picture.  This is not all the cousins by the way.  Two were still in Cedar Falls and two are on the way! -- I think Henry was as shocked as we were that he got the candles out on the first try without any help from any of the other kids.  (please excuse the dishes in the background)

So now I will sit back and enjoy my 3 year old...cause I'm sure when he turns 4 I'll be wishing to stop time again.  

God Bless!
Bec

3.11.2011

Raspberry Gelato

As you well know, my posting has been a little lax.  I'm being treated for TMD right now and because of that am on a soft foods diet.  Not really my idea of a great thing.  So the cooking at my house as been less than great and thus...no recipes worth sharing.

Except this one...
I came across this recipe and got really excited to make it because...well it was soft...and looked so good in the picture!  Oh my was it worth it!!  I've never had gelato before, and now that I have, I can't imagine having to eat sherbet or sorbet.  This is unbelievable...the most pure flavor I've ever tasted in a dish...you just have to try it for yourself.


Here are the basics...
12 oz bag frozen raspberries
2 T. + 2 t. splenda sugar blend (or 1/3 c. sugar)
1/3 c. whipping cream

Combine the raspberries with the sugar blend and allow to sit for about 15-20 minutes.  You want your raspberries to still be a little frozen.
Combine raspberry/sugar mixture in the blender with the whipping cream and blend until smooth.  It'll take a little time and some scraping and moving of the raspberries (I promise it'll be worth the work and the noise of the blender).
Place in a sealed container in the freezer for a few hours until firm.
Now go at it!

A few notes...
You can certainly skip the last step and just eat it straight from the blender...
You can substitute just about any fruit you want in this too...I haven't done any other ones yet, but I'm thinking mango would be unbelievable!

I definitely don't recommend the soft food diet...but this is certainly one of the positive things that has come out of it.

Update:  Raspberry-peach is a great variation on this.  I'm going to attempt not to finish the bowl tonight.  :)

2.24.2011

Half Baked Cookie

You know those days where all you can think about is dessert?  Chocolate...ice cream...something crunchy...warm and melty (yes, I know its not a real word)...Well I had one of those recently and the only thing I could think of to cure it was a half baked cookie.  Crunchy on the edge...warm and gooey on the inside...with ice cream and hot fudge on top...OH MY!!!!

This picture doesn't even begin to do justice to the deliciousness of this dessert!

I found the recipe over at Our Best Bites and it is so worth every calorie! (I actually skipped supper just so I could eat this without the guilt.)  The best part is it can be as "semi-homemade" as you want it to be.  You can make your own cookie dough and ice cream or buy them both store bought.  You can prep everything ahead and pop them in the oven when you are ready for dessert.  It doesn't get much easier than that.

Here are the basic directions

Preheat your oven to 350 F.  Fill ramekin about half full of cookie dough.  Bake for 15 minutes (edges should be golden brown, but still look uncooked in the center).  Take out of oven and allow to cool for about 5 minutes.  Top with ice cream and whatever else you want to top it with.  Sit back and enjoy...because it is SO worth it!  

(Note:  if you do not have ramekins, you could do this is small canning jars or mugs.  You will need to adjust your baking time accordingly if you use a larger size dish).

2.20.2011

Chocolate Donut Holes

The icy conditions outside led to a pajama clad morning at our house.  Without church to go to, I thought it was the perfect time to make chocolate donut holes.  I saw the recipe on Smitten Kitchen awhile ago and was just waiting for the perfect day to make them.  They are wonderful!!!  The kids enjoyed theirs coated in powdered sugar...I ate mine with my cup(s) of coffee.


I made a few changes to the original recipe - I only had dark chocolate powder on hand so I used that.  And instead of rolling them out and cutting them, I used a small cookie scoop to make balls and dropped them right into the hot oil.  This resulted in less than perfect "holes", but it was much easier.

Happy Eating!

2.19.2011

OAMC: Breakfast Burritos

I'll admit it...I love McDonald's Breakfast Burritos.  DH and I will find just about any excuse to go there to get them.  My waistline, however, does not care for fast food as often.  So, I began the search for a great breakfast burrito.  And while is certainly not "healthy", its gotta be better than fast food...and we love them just as much.  You can customize these to suit your personal preferences and they are great to keep in the freezer for a quick, hot breakfast.


Breakfast Burritos
Adapted from JeriBinNC at food.com


1 16 oz bag hash browns, cooked
18 eggs, scrambled
16 oz salsa
1 lb bacon, cooked & crumbled
1 lb country sausage, cooked
1/3 cup chopped jalapeƱos
8 oz. shredded cheese
18-24 tortillas
18-24 slices american cheese

After your ingredients are prepped, stir together hash browns, eggs, salsa, bacon, sausage, jalapeƱos, & shredded cheese in a bowl.

Place about 1/2 cup mixture in each tortilla.  Top with one slice american cheese; roll up burrito style.  Wrap each burrito individually in plastic wrap.  (I then put mine in gallon size freezer bags for storage)

When you are ready to eat, remove frozen burrito from plastic wrap.  Warm in microwave for 1 1/2 minutes on each side.  Enjoy!!

1.01.2011

Buttery Sugar Cookies


For Cookie
1 cup butter, softened 
1 cup sugar
2 eggs
1/2 teaspoon vanilla
1/2 teaspoon almond extract
3 1/4 cups all-purpose flour
1/2 teaspoon baking soda
1/2 teaspoon baking powder
1/2 teaspoon salt

For Icing
2 cups sifted confectioners' sugar 
1 tablespoon milk (adding in more if needed)
1 tablespoon light corn syrup
1/4 teaspoon almond extract  or
1/2 teaspoon vanilla extract
    food coloring (use your choice of colors)


For cookies; in large bowl combine butter with sugar, eggs, vanilla and almond extract; beat using an electric mixer on high speed until light and fluffy.
In another bowl combine the flour with baking powder, baking soda and salt; gradually stir into the butter mixture until well blended.  Cover bowl with plastic wrap and chill for 2 hours.
Set oven to 400°F.  Line cookie sheets with parchment paper (do not grease cookie sheets use parchment paper only).
On a very lightly floured surface roll out the dough into about 1/4-inch thickness.  Cut into desired shapes using cookie cutters.  Place cookies 2-inches apart on cookie sheet.  Bake 4-6 minutes.  Remove cookies to wire racks to cool completely before icing.
For the frosting; in a small bowl mix the confectioners sugar with milk (start with 1-2 tablespoons, you will likely need more milk for the perfect spreading consistency).  Beat in corn syrup and almond extract until the icing is smooth and glossy (if the icing is too thick add in a small amount more of corn syrup).
Divide into as many separate bowls as you wish for different colors.  Add in food coloring until desired intensity is achieved.  Paint the icing over the cookies using a brush, or dip edges of cookies into icing.  Allow to set on waxed paper.